Video to Scrollsequence
The Video to Scrollsequence (vid2ssq) tool allows you to convert any video into an image sequence directly inside WordPress, optimized for the Canvas 2D block.
The tool provides two processing models via the Model selector:
- Asset Pipeline SDK (Recommended): The next-generation pipeline powered by
scrollsequence/sdk. It extracts frames locally in browser memory, generates multiple responsive resolution tiers, produces a standardizedscrollsequence-manifest.json, and offers optional AI depth maps, subject tracking, and vision analysis. - Local FFmpeg (Legacy): The original client-side
ffmpeg.wasmconverter. It extracts frames in the browser and uploads them sequentially one-by-one to your WordPress media library (ssq-mediacustom post type).
Recommendation: Use the Asset Pipeline SDK model whenever possible. It produces multi-resolution responsive sequences and a scrollsequence-manifest.json file, which is the most performant and memory-efficient way to drive Canvas 2D animations.
Accessing the Tool
- Open the WordPress block editor (Gutenberg).
- Add a Canvas 2D block to your page or post.
- In the Canvas 2D block toolbar or inspector controls, click the Media Tools icon.
- Select Video to Scrollsequence from the tool menu.
- Choose your desired conversion engine from the Model dropdown:
- Asset Pipeline SDK (default & recommended)
- Local FFmpeg (legacy)
Model 1: Asset Pipeline SDK (Recommended)
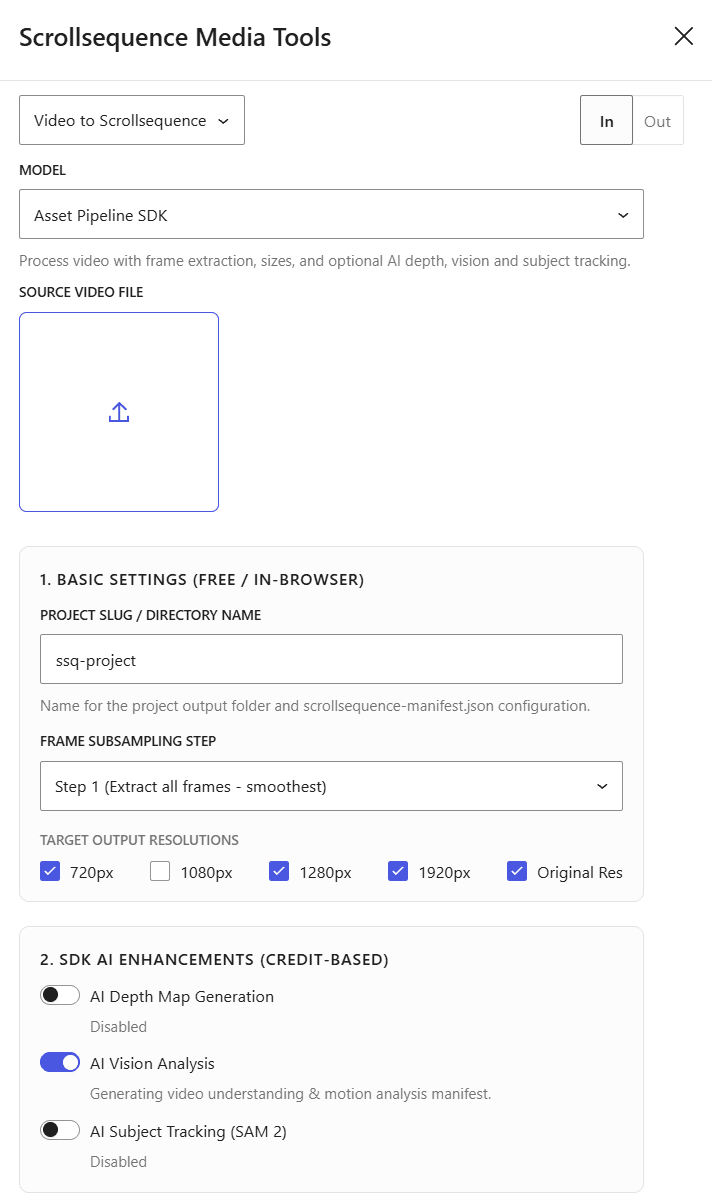
The Asset Pipeline SDK model runs directly in your browser using the Scrollsequence Asset Pipeline SDK. It processes your video in virtual memory and packages the complete project into a downloadable .zip archive containing responsive image folders and a scrollsequence-manifest.json file.
1. Basic Settings (100% Free / In-Browser)
These settings run entirely on your local machine inside the browser and require no API key or credits:
- Source Video File: Upload or select the source video (
.mp4,.mov,.webm, etc.). - Project Slug / Directory Name: Enter a clean, sanitized identifier for your sequence (e.g.
product-reveal). This name will be used for the output directory and withinscrollsequence-manifest.json. - Frame Subsampling Step: Choose how densely frames should be extracted:
- Step 1 (Extract all frames - smoothest): Extracts every single frame from the video for the smoothest possible animation.
- Step 2 (Extract every 2nd frame): Reduces the frame count and payload by half while preserving smooth motion.
- Step 3, 5, 10: Subsamples frames for stylized transitions or lightweight, fast-loading sequences.
- Target Output Resolutions: Check the responsive sizes you want the SDK to generate simultaneously:
720px(mobile)1080px(tablets / laptops)1280px(desktop)1920px(Full HD desktop)Original Res(unscaled native resolution)
When multiple resolutions are selected, the Canvas 2D block will automatically serve the optimal resolution based on the visitor’s screen width, minimizing bandwidth consumption.
2. AI Enhancements (Optional / Credit-Based)
If you have configured a Scrollsequence API key in your WordPress settings, you can toggle advanced AI features:
- AI Depth Map Generation: Automatically computes 3D depth maps for each extracted frame. This enables interactive 3D displacement, cursor tilt, and parallax depth effects in Canvas 2D and Canvas 3D blocks. Learn more in the 3D Depth Maps Guide.
- AI Vision Analysis: Analyzes the video’s motion dynamics, scene boundaries, and visual subjects, embedding semantic metadata into the manifest.
- AI Subject Tracking (SAM 2): Provide a text prompt describing a focal subject (e.g.
car,runner,sneaker,watch). The AI tracks the subject across all frames, generating tracking bounding boxes and trajectory data for interactive callouts or annotations.
API Key Setup: Basic frame extraction and multi-resolution sizing are completely free and run locally in your browser. AI features require an API key, which can be configured under your WordPress admin Scrollsequence settings.
3. Processing and Importing
- Click Create & Process Project.
- The real-time log will show each stage of processing: initializing the pipeline, extracting frames, scaling images, and packaging the assets.
- Once completed, the tool generates a
.ziparchive containing:- Resolution folders (
720/,1080/,1280/,1920/, ororiginal/) - Extracted frame images (
0001.jpg,0002.jpg, …) scrollsequence-manifest.json(specifying frames, dimensions, aspect ratio, frame rate, and optional depth/tracking data)
- Resolution folders (
- Import to Canvas 2D:
- Click the Download button in the Outputs panel to save the
.zipfile. - Upload and extract the zip archive into your WordPress uploads directory (e.g.
/wp-content/uploads/scrollsequence/product-reveal/) or to an external CDN / S3 bucket. - In the Canvas 2D block settings, select Manifest JSON under Media Groups.
- Paste the folder URL (e.g.
https://example.com/wp-content/uploads/scrollsequence/product-reveal/). The Canvas 2D block will instantly detectscrollsequence-manifest.jsonand load the sequence.
- Click the Download button in the Outputs panel to save the
Model 2: Local FFmpeg (Legacy)
The Local FFmpeg model uses ffmpeg.wasm to convert videos into JPEG image sequences entirely inside the browser and uploads them directly to your WordPress media library.
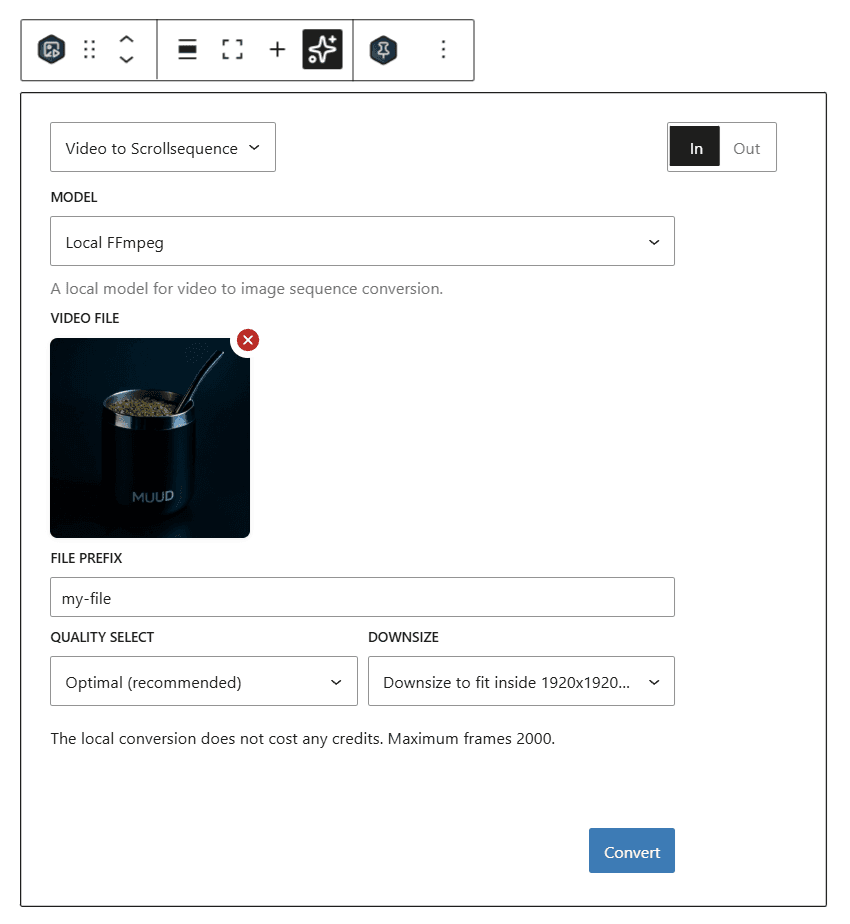
Settings
- Video File: Upload or select the source video file.
- File Prefix: Specify a 1-16 character alphanumeric prefix for the extracted images (e.g.
hero). - Quality Select: Choose the image compression level:
Original (no compression)(qscale: 2)Optimal (recommended)(qscale: 5)Aggressive (lossy)(qscale: 15)
- Downsize:
Downsize to fit inside 1920x1920px rectangle (recommended): Scales larger videos down so neither width nor height exceeds 1920px.No resize: Retains the video’s original pixel dimensions.
Execution & Storage
- Click Convert.
- The browser compiles and runs
ffmpeg.wasm, extracting video frames (up to 2,000 frames) as JPEG files. - The plugin automatically creates an
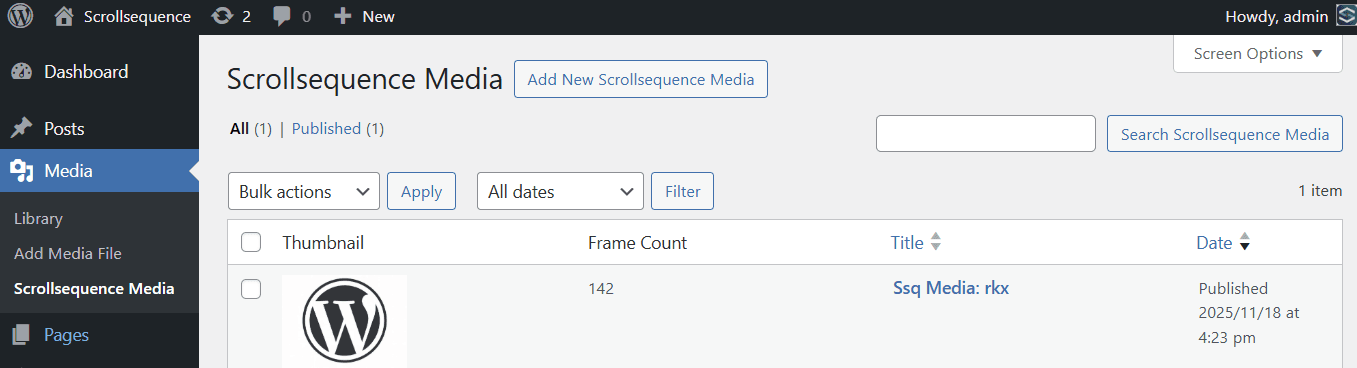
ssq-mediaCustom Post Type entry in WordPress to track the sequence. - Each extracted frame is uploaded sequentially to your WordPress server via REST API into:
wp-content/uploads/scrollsequence/{id}-{prefix}/%04d.jpeg - Once uploaded, the output provides an array of image URLs ready to be used in Canvas 2D.
Limitations of Local FFmpeg
- Single Resolution Only: It generates only a single image size, meaning mobile devices must download the same image sizes as desktop screens.
- No Manifest File: Does not generate
scrollsequence-manifest.json, missing out on precomputed frame sizes, dimensions, and caching metadata. - Sequential REST Uploads: Uploading hundreds of individual image files one by one can be slow and may hit server timeouts or upload limits on some hosting providers.
- No AI Features: Depth map generation, vision analysis, and subject tracking are not available in the legacy model.
Feature Comparison
| Feature | Asset Pipeline SDK (Recommended) | Local FFmpeg (Legacy) |
|---|---|---|
| Engine | Scrollsequence Asset Pipeline SDK (scrollsequence/sdk) | WebAssembly FFmpeg (@ffmpeg/ffmpeg) |
| Recommended Media Group | Manifest JSON | URL Image List or WP Media Images |
| Manifest Generation | Yes (scrollsequence-manifest.json) | No |
| Responsive Resolutions | Multiple simultaneous tiers (720, 1080, 1280, 1920, original) | Single resolution (original or downsized to 1920px) |
| Frame Subsampling | Yes (Step 1, 2, 3, 5, 10) | No (extracts sequential frames up to 2000) |
| AI 3D Depth Maps | Yes (optional, requires API key) | No |
| AI Subject Tracking (SAM 2) | Yes (optional, requires API key) | No |
| AI Vision Analysis | Yes (optional, requires API key) | No |
| Asset Delivery | Standalone .zip package (extract to uploads/ or CDN) | Sequential REST upload of single frames to WordPress |
| Host Server Impact | Zero server load during conversion; clean folder extract | Server processes hundreds of sequential REST POST requests |
Next Steps
- Learn more about configuring the Canvas 2D Block.
- Explore the Manifest JSON format and Asset Pipeline.
- Need to process large videos or batch convert via terminal? Check out the CLI Wizard (
vid2ssq) and Asset Pipeline SDK.